Tuesday, 20 May 2025

How to use multiple prompts for same dimension in Management Reporting

Requirement 

Like the Financial Reporting (FR), Management Report and Platform Reports do not support the multiple prompts selection for same dimension in grid. In a business scenario where we need to have multiple prompts for same dimension, it can be achieved using "Save selection" option. In below steps, we will discuss how can we use "save selection" option to meet the requirement of multiple prompts selection for same dimension.

For this demonstration, we will create the save selection for Period dimension.

1. Go to Grid -> open the window of Member Selection for Period dimension. click on "fx" and select the "View All Functions".


 2. Choose the Prompt and select the Prompt Label, Choice List and other options. Click on OK.

 3. As shown in below screen shot, click setting button and click on "Save Selection". 

 4. As shown in below screen, provide a name to save selection and click on OK.

 5. Click on OK. This save selection can be used in places within same grid.

 6. Go to another cell where we need to select prompt for period dimension again. As shown in below screen shot, from drop down select the "Save Selections".


 7. It will list down all the saved selections. choose the save selection for period which we created in above steps.


 This way, we can meet the requirement of multiple prompt for same dimension in a grid.


 Created by Mohit Jain and Megha Gupta

How to skip the EPM monthly updates / patch using epm automate command

Using the skipUpdate epm automate command, one can requests Oracle to skip the applying of monthly updates to an environment for a maximum of three consecutive cycles or removes all skip update requests that were previously made using this command so that the environment is updated to the main code line.
epmautomate skipUpdate add|remove|list [version=UPDATE_NUMBER comment="COMMENT"] 
  • add sets a skip update request for a specific monthly update. You must specify below parameters of version and comment along with add paramater.
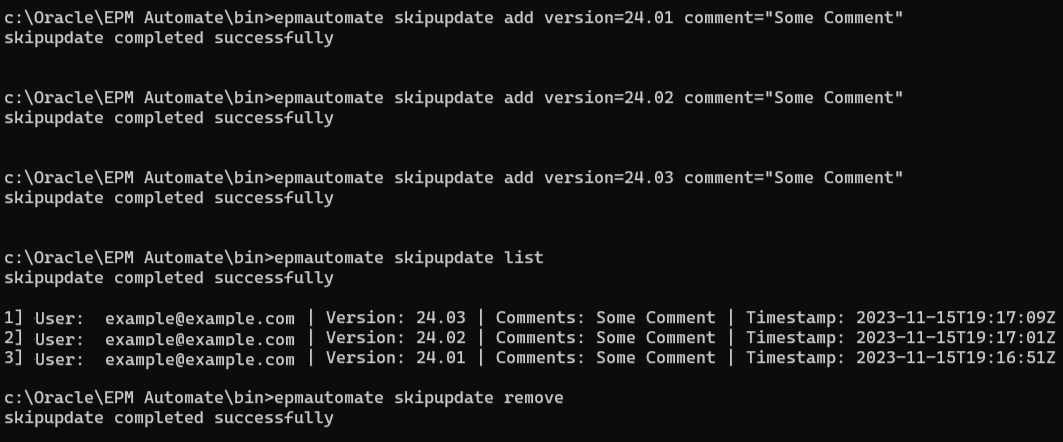
        version: the monthly update that should be skipped. You can skip one, two or     three of the upcoming three-monthly updates. For example, if the environment is on the 23.12 monthly update, you can skip the 24.01, 24.02, 24.03 or any of these updates. To skip three monthly updates, you run the command thrice, each time specifying one specific update to skip using, for example, version=24.01, then version=24.02, and then version=24.03. 
    If there is a gap in the monthly cycle for which skip update is requested and the current monthly cycle, Oracle will update the environment as required and then skip the updates in the specified monthly cycle. For example, the environment is on the 23.12 monthly update and you specify a skip update for versions 24.02 and 24.03. In this case, the environment will be updated in 24.01; 24.02 and 24.03 updates will be skipped. The environment will be updated to the main code line in 24.04. In this scenario, the environment will be updated to the main code line in the 24.04 monthly cycle.
    comment: text describing why an update skip is required. Comments must be enclosed in double quotation marks.
remove removes all skip update requests specified for the environment so that it can be updated to the main code line during the next daily maintenance.If there is  more than one skip update requests on an environment, this command removes them all.
list to display skip update requests (the login ID of the user who made the skip update request, comment, version for which updates are to be skipped, and the date when the request was made) currently set for the environment as shown in the following graphic:
Sample list of skip update requests in an environment

Examples
  • Request a skip update: 
    • epmautomate skipUpdate add version=25.05 comment="We are in the process of production go live"
  • View skip update details: 
    • epmautomate skipUpdate list
  • Remove all skip update requests: 
    • epmautomate skipUpdate remove
Note:
  • Weekly and emergency patches for the current month, if any, will continue to be applied to the environment. 
  • No updates will be made for the months for which the upgrade delay is requested.
  • You cannot skip updates for an environment that is on a one-off patch. 
  • Additionally, you cannot skip monthly updates that are more than three months apart from the update that the environment is currently on. For example, if the environment is currently on 24.12, you can skip 25.01, 25.02, and 25.03, but not 25.04.
  • If you skip the update for only one of your environments (for example, you skip update on the production environment but not on the test environment) for three months, your environments will be three versions apart. You may not be able to migrate snapshots across these environments in such a scenario. 
  • For example, assume that your test and production environments are currently on 23.12, and that you skip the updates for versions 24.01, 24.02, and 24.03 for the production environment only. When version 24.03 becomes available, your test environment will be on version 24.03 while the production environment will still be on version 23.12. In this case, migration between your test and production environments is not supported.
  • Skip update status of the environment is included in the Activity Report (in Operational metrics) generated after you use this command to skip updates to an environment
Applies to
  • Planning, Planning Modules
  • FreeForm
  • Financial Consolidation and Close
  • Tax Reporting
  • Account Reconciliation
  • Profitability and Cost Management
  • Enterprise Profitability and Cost Management
  • Oracle Fusion Cloud Enterprise Data Management
  • Narrative Reporting
  • Sales Planning
  • Strategic Workforce Planning
Required Roles
    Service Administrator

Created by Mohit Jain and Megha Gupta

Enhancements to Exception Management through Automated Alerts

From release 25.05, in Transaction Matching, Service Administrators can configure alert rules to automatically generate alerts for unmatched transactions in a match type. 

A new tab named Alert Rules within the Match Process tab has been added into Create Match Type or Edit Match Type. Under this, a new type of job, Auto Alert job, is introduced to manage the generation of automated alerts for a match type. 

The Auto Alert job will process the alert rules defined for the match type and then automatically create alerts where required.


To set up rules that generate automated alerts for a match type:

  1. Navigate to the Match Process tab of the match type.
  2. Click the Alert Details tab.
  3. Click New (the Plus icon) to display the New Rule dialog.
  4. Enter a unique ID for the alert rule.
  5. In Name, enter the name of the alert rule.
  6. In Description, enter an optional description for the alert rule.
  7. Select Active to indicate that the alert rule is in the active state.
  8. In Alert Name, enter the name of the alert that will be created for this alert rule. The name can contain a placeholder for member attributes within a group attribute. The placeholder must be enclosed within curly braces and will be replaced when the alert is generated. For example, Missing Deposit for {Store}.
  9. In Alert Description, enter a description of the alert.
  10. In Alert Type, select the alert type associated with this alert. rule.
  11. In Priority, select one of the following priorities for the alert: High, Medium, or Low.
  12. In Notification Assignee, select the user to who an email notification must be sent when the alert is created.

    This can be a standard user or a member attribute of type User. This field is non editable and the member attribute name or user name is displayed as specified in Alert Type.

    If the notification assignee is not set in the associated Alert Type, then it can be edited in this alert rule. A default user can be selected for the alert created by this rule.

  13. In Assignee, specify the user to whom this alert is assigned. The options are Preparer, From Alert, or Specify. If Specify is selected, click the Add User icon and select a user.
  14. In Approver, select the approver for this alert. Options are None, From Alert Type, or Specify. If Specify is selected, click the Add User icon and select a user.
  15. In Duration, specify a duration for the alert.
  16. Under Filters, specify the filter conditions for this alert rule.

    This section displays the list of data source filters that are defined for this match type. At least one filter must be created. Select the data source attributes and specify a condition for the alert rule.

  17. Click OK.

In below screenshot, an alert has been created for an unmatched transaction. 


Note: 

  • The maximum number of alert rules that be created is 500. The maximum number of transactions in a single alert is 1000.
  • A new column Notification Assignee is added. When an automated alert is generated, email notifications are sent to the notification assignee.
  • The alert can be automatically escalated if it’s not closed within the configured number of days.
  • When all the transactions for a given alert are matched, the alert gets automatically closed.
  • Member attributes (within a group attribute) of type User can be associated with alerts. These users can be included as Assignee, Notification Assignee, Approver, and Viewer.
  • Email notifications have been enhanced so that they contain more details about the exception that occurred and what action must be taken.

RunAutoAlert EPM Automate Command

The new runAutoAlert EPM Automate command is now available. This command runs the Auto Alert job for a Match Type. The job processes alert rules and then automatically creates alerts for unmatched transactions where required. You can monitor the status of the Auto Alert job through the Job History tab.

Applies to

  • Account Reconciliation

Business Benefit: This feature enhances the exception management functionality by enabling Service Administrators to automate the process of creating alerts.


Created by Mohit Jain and Megha Gupta

User Interface Changes in a Match Procces in ARCS Transaction Matching module

From release 25.05, in Transaction Matching module, there are some GUI related changes has been introduced. 

In TM module, below are some User Interface changes in the Match Process tab -

  • Default support values for a match process is now moved to the new Support Details tab in the Match Process tab.

  • The Rules tab has been renamed to Match Rules.
  • When configuring manual match rules, in the Adjustment Details tab, the drop-down that contains the values Adjustment and Support is removed.

Old interface screenshot -  
    

New Interface screenshot -

Applies to:
  • Account Reconciliation

Business Benefit:

This feature provides a simpler and more intuitive way to configure default values for support attributes.


Created by Mohit Jain and Megha Gupta

Ability to Create and Manage External Users

Service Administrators can now use the Manage Users tab under Access Control to create, edit, and delete external users (users who are not p...