Showing posts with label Oracle EPM ARCS. Show all posts

Wednesday, 27 May 2026

The Journey of Oracle ARCS: How Automation and AI Rewrote Account Reconciliation

 Account reconciliation has historically been one of the most labor-intensive phases of the corporate financial close cycle. For decades, corporate accounting teams were trapped in a cycle of manual data extraction, disparate spreadsheets, and fragmented audit trails. This reality exposed organizations to significant operational risk, compliance bottlenecks, and delayed financial reporting.

The evolution of enterprise technology has fundamentally altered this paradigm. At the forefront of this shift is Oracle Account Reconciliation Cloud Service (ARCS). Over the past two decades, this solution has transformed from a rigid, infrastructure-heavy on-premises tool into an agile, cloud-native suite, and ultimately into an autonomous, AI-driven framework.

1. The Legacy Era: Hyperion ARM and On-Premises Constraints

Before the maturity of cloud computing, enterprise reconciliation was primarily managed via legacy systems. Oracle’s flagship offering in this space was Hyperion Account Reconciliation Manager (ARM), deployed as an on-premises module within the broader Hyperion Financial Close Management ecosystem.

While Hyperion ARM successfully digitized the foundational workflow of reconciliation—establishing formal paths for preparers and reviewers—it presented clear operational limitations:

  • High Infrastructure Overhead: On-premises deployments required substantial capital expenditure for server maintenance, database administration, and iterative, disruptive upgrade cycles.

  • Rigid Customization: Creating transaction matching rules or complex data integrations required extensive IT support and specialized script writing, often utilizing Visual Basic (VB) or database procedures.

  • Siloed Data Architecture: Data extraction from external General Ledgers (GL) or sub-ledgers relied on batch processing and flat-file transfers, introducing latency into the close window.

2. The Cloud Paradigm Shift (2016–2017)

Recognizing the limitations of localized infrastructure, Oracle officially launched Account Reconciliation Cloud Service (ARCS) as a standalone Software-as-a-Service (SaaS) solution. This pivot to the cloud dismantled the infrastructure barriers that had long hampered corporate accounting teams.

The introduction of ARCS brought two distinct architectural improvements to the market:

  1. Reconciliation Compliance (RC): A web-based compliance engine that centralized the monitoring, reporting, and auditing of account reconciliations globally.

  2. Transaction Matching (TM): A high-performance engine capable of ingestion and automated matching of high-volume transaction data (e.g., millions of point-of-sale entries against bank statements).

By shifting to a graphical user interface (GUI) and configuration-driven logic, Oracle empowered finance users to build their own matching rules, formats, and workflows independently of corporate IT departments.

3. Consolidation into the Unified EPM Cloud Suite (2019–2021)

As cloud ecosystems matured, the market demanded deeper interoperability. Oracle responded by absorbing ARCS into its comprehensive, unified Oracle Cloud EPM (Enterprise Performance Management) platform.

This consolidation transformed account reconciliation from an isolated monthly chore into a continuous business process. Native integration within the EPM suite allowed ARCS to communicate directly with Oracle Financial Consolidation and Close (FCCS) and broader ERP ledgers. Data flows became automated, giving close managers real-time visibility into reconciliation statuses, variance analysis, and balance sheet integrity directly from centralized corporate dashboards.

4. The AI and Machine Learning Frontier: Achieving the Touchless Close

Today, Oracle ARCS represents the cutting edge of financial technology, utilizing embedded Artificial Intelligence (AI) and Machine Learning (ML) algorithms. The software has transitioned from a system that merely tracks manual accounting activities to an intelligent framework that executes them.

Modern AI capabilities have re-engineered the reconciliation workflow across three primary vectors:

1. Raw Transaction Data

2. Intelligent Auto-Match Engine (Complex many-to-many ML matching)

3. Continuous Anomaly Detection (Real-time variance identification)

4. Risk-Based Auto-Certification (System-generated audit trails)


Intelligent Transaction Auto-Suggest

Traditional rules-based matching engines fail when encountering complex data anomalies—such as timing differences, currency fluctuations, or fragmented vendor descriptions. Historically, these exceptions fell into manual queues, requiring accountants to hunt down matching lines across spreadsheets.

The integrated ML engine analyzes historical matching patterns and human corrective actions over time. When a data anomaly occurs, the system calculates a statistical confidence score and automatically suggestsmatches to the user. This turns a tedious search-and-verify task into a simple, single-click approval process.

Continuous Anomaly and Variance Detection

Rather than waiting for the close cycle to begin to identify ledger discrepancies, ARCS now utilizes background AI algorithms that scan active data pipelines continuously. By establishing a baseline of historical trends and transaction behaviors, the system flags unusual variances, duplicate billings, or suspicious ledger postings in real time. This allows accounting departments to remediate errors prior to the high-pressure period-end close window.

Automated Risk-Based Certifications

A significant portion of a finance team's time during a close cycle is spent verifying low-risk, low-activity, or zero-balance accounts. Oracle ARCS leverages AI to execute automated, risk-based certifications. If an account meets specific low-risk operational thresholds and data validation rules, the AI signs off on the compliance documentation, generates the necessary audit trail, and archives the file. This filters out the operational noise, allowing senior accountants to focus exclusively on complex, high-risk variances.

Looking Forward: The Future of Financial Integrity

The evolutionary path of Oracle ARCS mirrors the broader digital transformation of the corporate finance function. By migrating from the manual constraints of Hyperion on-premises to a cloud-native environment, and ultimately incorporating advanced AI and Machine Learning, Oracle has fundamentally changed how corporations view risk and financial data validation.

The ultimate objective of this journey is the realization of a continuous, touchless financial close. Through persistent AI oversight, automated data harmonization, and self-learning matching logic, Oracle ARCS ensures that financial data integrity is maintained continuously throughout the fiscal period—not just during the first week of the month. For enterprise organizations, this translates to reduced compliance risks, minimized operational costs, and the transformation of the accounting function from historical bookkeepers into strategic, data-driven business partners.

Thank you!

Saturday, 2 August 2025

Data Integration Pipeline Extended to Account Reconciliation

From Aug 2025 monthly patch release, the Pipeline in Data Integration is now available to Account Reconciliation environments.  The Pipeline is used to orchestrate a series of routine tasks within Cloud EPM Platform as a single process.

Below is the sample example of Pipeline in ARCS where we are performing below tasks - 
  • Open the Period
  • Load Rate
  • Import Pre-mapped Balance
  • Create Reconciliation
  • Close period

Below are the sample screen shots while creating job in pipeline -


New Pipeline job types specific to Account Reconciliation include:

  • Create Reconciliation: (Reconciliation Compliance) Copies all selected profiles to a period and return success or failure status.
  • Generate Report for Account Reconciliation: Generates either a single predefined Reconciliation Compliance report, predefined Transaction Matching report or a custom report.
  • Import Attribute Values: Imports attribute values into an existing list attribute or group attribute. In Transaction Matching, only group attributes can be imported.
  • Import Balances: (Reconciliation Compliance) Imports balances data using Data Integration from a previously created integration definition and returns a success or failure status.
  • Import Pre-Mapped Balances: (Reconciliation Compliance) Imports pre-mapped balances and returns the success or failure status.
  • Import Pre-Mapped Transactions: (Transaction Matching) Imports a file of pre-mapped transactions into Transaction Matching and returns the success or failure status.
  • Import Rates: (Reconciliation Compliance) Imports rates for a particular period and rate type, and returns the success or failure status.
  • Run Auto Match: (Transaction Matching) Runs the auto match process in Transaction Matching.
  • Run Auto Alert: (Transaction Matching) Runs the auto alert process for the specified match type in Transaction Matching. This job processes the alert rules defined for the match type and then automatically creates alerts for unmatched transactions. Status of an Auto Alert job can be monitored through the Job History tab in Account Reconciliation.
  • Set Period Status:  (Reconciliation Compliance) Changes the status of a period (open, closed, pending, locked) and returns the success or failure status. 

Applied to: ARCS

Business Benefit

The Pipeline functionality allows users to conduct a sequence of Account Reconciliation focused operations such as importing balances, pre-mapped balances and transactions, rates and so on, streamlined in one location and executed then in serial or parallel mode.

Updated on: Aug 02, 2025

Sunday, 29 June 2025

Future of Infolets: Plan to Discontinue Support for Infolets

Plan to Discontinue Support for Infolets

About Infolets

Infolets enable users to view and interact with high-level, essential information generated from different sources so that they can quickly assess where to direct their attention. Service Administrators create, redesign, delete, and assign permissions to infolets.

An infolet is a self-contained, interactive box-shaped container used to display information using text and charts. Infolets are interactive and use progressive disclosure to display high-level, aggregated, essential information for quick consumption at a glance, and then can be acted upon as needed. Infolets can be flipped and resized to display up to three charts or sets of values.


Future of Infolets

Starting with the October 2025 (25.10) update, Oracle will no longer support the following infolet actions:

  • Creation of new infolets
  • Copy As, which duplicates an existing infolet
  • Designating an infolet as Default and defining infolet dots on the Home page

This change applicable to Enterprise Profitability and Cost Management, FCCS, FreeForm, Planning, and TRCS.

Thank you!


Sunday, 15 June 2025

Importing the pre-mapped transactions for Reconciliation Compliance Applications in Data Exchange - New Options

From 25.06 release, using Data Exchange to import pre-mapped transactions, the following new options are available:
  • Date format: Specifies the data format for transactions
  • Use comma as decimal separator: Set Yes or No to indicate if a comma must be used as a decimal separator

When registering an application, or creating a data integration, we can set the above options by using Data Exchange under the Application card.


Where for Data format, available options are -
    • MM/dd/yyyy
    • MM-dd-yyyy
    • MMM d, yyyy
    • d-M-yyyy
    • dd-MMM-yy
    • dd/MM/yyyy
    By default, the date format is blank, which enables the system to use means all date format to parse date values.

    And
    Use commas as decimal separator, select Yes to use a comma as the decimal separator.

    Select No to use the user locale for number parsing. 

    By default, this option is set to No (the decimal separator is based on the user locale and not a comma.)
In below section, we will talk how to register the reconciliation compliance Transactions application. 

Registering a Reconciliation Compliance Transactions Application

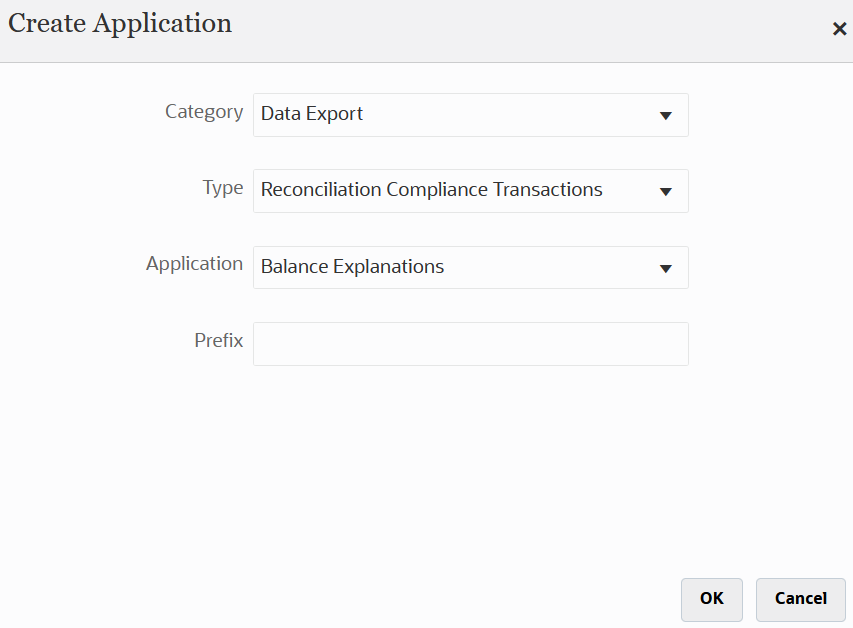
To register a Reconciliation Compliance Transaction application by selecting the "Data Export" category and "Reconciliation Compliance Transactions" as the application type, and then you select the application name.

To add a Reconciliation Compliance Transactions target application:

  1. From the Data Integration home page, and then Actions, select Applications.

  2. On the Applications page, click Image shows the Add icon. (Add icon).

  3. On the Create Application page, and then Category, select Data Export.

  4. From Type, select Reconciliation Compliance Transactions.

  5. From Application, select the Reconciliation Compliance Transactions application transaction type.

    Application Name is a drop-down list with the following transaction types:

    • Balance Explanations
    • Source System Adjustments
    • Subsystem Adjustments
    • Variance Explanations

    Image shows the Create Application page for a Reconciliation Compliance Transactions application.

  6. In Prefix, optionally specify a prefix to make the application name unique.

    The prefix is concatenated with the application name to form a unique application name. For example, if you want to name an application with the same name as an existing one, you can assign your initials as the prefix.

  7. Click OK.

  8. From the Applications page, select the Reconciliation Compliance Transactions Application that you just registered above, then click Image shows Select icon. to the right of the application, and then select Application Details.

  9. Select the Options tab.

    Your selections on the Options tab apply to the target application.

    Image shows the Options tab of Application Details.

  10. Click Save.

Business Benefit: This feature provides additional flexibility and improves usability when loading pre-mapped transactions.

Friday, 30 May 2025

Creating Custom Dashboards in ARCS

Custom Dashboards

Dashboards provide enhanced reporting capabilities. They enable users to chart, evaluate, and (in some cases) even change key business data. Custom dashboards provide greater visibility into reconciliation process.

Each dashboard can have a maximum of four views. This includes list views, pivot views, or chart views. You can open a maximum of 10 dashboards at a time. Service Administrators, or any user who is granted either the Operational Dashboards - Manage role or Dashboard - Manage role can create and edit dashboards. The dashboard creator can also control access to the dashboard by granting permissions to one or more users, groups, or teams. Users who have been granted access to a dashboard can run the dashboard and view its data. The access only allows a user to view the dashboard. It doesn't extend their access to the underlying data. Therefore, a user can only view records based on their own access within the service.

Features of Custom Dashboards

Dashboards provide the following features:

  • Visualize data interactively with a wide variety of chart types
  • Obtain both high-level and detailed insights into the performance of your reconciliations
  • Create filters at the dashboard level and at the individual view level

    Filters created at the dashboard level are applied to all the views within the dashboard. After this, filters defined at the view level (if any) are applied.

  • Control access to viewing dashboards
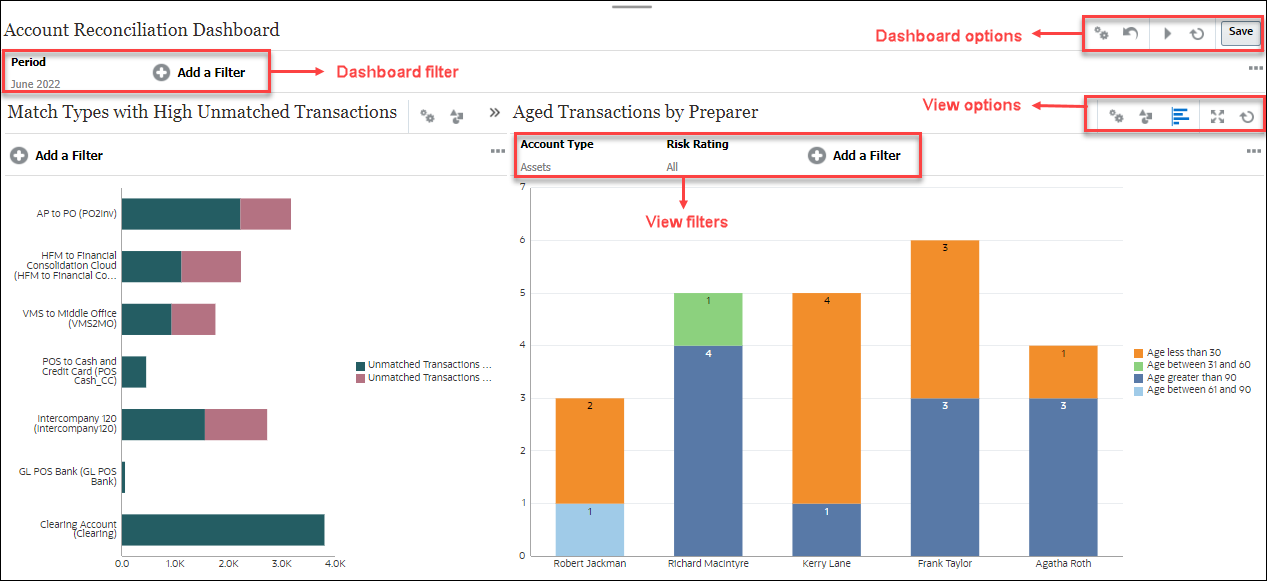
Custom Dashboards: Design Mode

The design mode of a dashboard enables admin to configure and manage your dashboard and its components (chart views, list views, and pivot views).

This image shows the design mode of a custom dashboard that contains two chart views.

Custom Dashboard Design Mode

At the top-right are these options to manage the dashboard:

  • Settings iconSettings

    Edit the properties of the dashboard.

  • Revert iconRevert

    Revert changes made to the dashboard properties.

  • Run icon Run

    Run the dashboard.

    Dynamically fetches and displays data in the dashboard. Only users who have been granted permissions can view the dashboard's data.

    In Run mode, users will see only the Refresh and Expand options.

  • Refresh iconRefresh

    Refreshes the data displayed in the dashboard, including all the contained views.

  • SaveSave

    Saves the changes made to the dashboard properties.

Each view (list, chart, or pivot) within the dashboard contains these options:

  • Settings iconSettings

    Edit the properties of the chart, list, or pivot view.

  • Object Type iconObject Type

    Options are: Reconciliation, Transactions, Alerts, Detail Balances, Profiles, and Matching.

  • View Selector iconView Selector

    Options are: Chart View, List View, or Pivot View.

  • Expand iconExpand

    Displays the view in the entire dashboard area.

    This option is shown only when a dashboard contains more than one view.

  • Refresh iconRefresh

    Refreshes the data displayed in the view.

 Steps to Create dashboards:

1. From the Home page, click Dashboards, and then Custom. The Dashboards page appears,

with the list of existing dashboards.

2. Click the New icon. The new dashboard is opened in a new tab. It contains the following:

• A default name, in the format New Dashboard #.

• One empty view (list view, pivot view, or chart view)

• Two sets of icons (at the top-right) that correspond to the options for the dashboard and

the view within the dashboard.

• A filter for filtering data at the dashboard level. Click Add a Filter to add filters.

3. In the set of icons that correspond to the dashboard, click the Settings icon. The Edit

Dashboard dialog appears.

4. In the Properties tab, specify the required dashboard properties

5. Click the Access tab to give access to this dashboard for users, groups, or teams. Users who

are granted access can run this dashboard and view its data.

6. Click OK. A separate area, with its corresponding icons, is shown for each area specified by

the dashboard layout. For example, if you set Layout to Grid, the page shows four separate

areas.

7. For each area within the dashboard, set the object type based on which you want to

visualize the data.

8. For each area within the dashboard, click the select the View Selector icon and specify the

type of view.

9. For each view, click Settings and specify the settings for that view.

10. Click Save to save the dashboard settings.


Created by Mohit Jain and Megha Gupta

Thursday, 22 May 2025

Load Additional Information with Balances by Using Balance Attributes in ARCS

From monthly release 25.05, when loading balances, additional information related to balance can be loaded in ARCS through Data integration. 

This additional information can then be used when defining format rules, profile rules, filters, columns, dashboards, and calculated attributes. To load additional data related to balances, balance attributes need to create.

About Balance Attributes

A balance attribute is a user-defined attribute that contains additional information about the balances that are loaded into ARCS application.

The balance attributes are available directly with the data and are also aggregated into any reconciliations associated with the data. Service Administrators can specify which balance attributes they want to load along with their balances and how to handle aggregating each one. Balance attributes can be displayed in the Reconciliation List, Transactions tab, Reconciliation Balances tab, and Detail Balances tab. 

Use Select Columns from Actions to specify which balance attributes must be displayed. Balance attributes can also be used when defining filters, format rule conditions, profile rule conditions, custom reports, and custom dashboards.

Note:

Existing custom attributes or calculated attributes can't be used to load additional information about balances.

Balance attribute data is aggregated and stored at multiple levels:

  • Detail Balance (if specified): Transactional level data will be aggregated by Segments, Sub-segments, Currency Buckets, Currencies and Balance Types
  • Reconciliation Balance: Transactional level data or Detail Balances (if specified) will be aggregated by Segments, Currency Buckets, Currencies and Balance Types
  • Reconciliations: Reconciliation Balance data will be aggregated by Account ID.

Balance attributes can be viewed along with the sub-segment balances that have been loaded. 

Balance attributes are associated with the data, not the reconciliation. Therefore, if a reconciliation is deleted, the data still exists in the balance attribute and will be displayed in the Balance and Detail Balance dashboards. If the reconciliation is recreated, the balance attributes are included in it.

In the source file that is used to load balances, the balance attribute values must appear in the same row as the corresponding balance.

Creating Balance Attributes

Service Administrators can define up to a maximum of 20 balances attributes in an application.

To create a balance attribute:

  1. From Home, select Application, then Configuration
  2. Click the Attributes tab.
  3. Click the Balance tab.
  4. Click Add. The New Balance Attribute dialog displays.


5. In Name, enter a unique name for the balance attribute.
6. In Type, select the type of attribute. Depending on the type selected, some additional information may need to be provided.
7. Select Reopen if you want the reconciliation to be reopened with the Preparer when the value of this balance attribute changes.

The created balance attributes will appear automatically in the Dimensions tab of the Reconciliation Compliance Balances target application. The Dimension that you associate with a balance attribute must be of type LOOKUP or Attribute.


Note:

When loading balances using Data Integration, balance attributes of type Multi-line Text will not enforce limits on the number of lines.

About Using Balance Attributes

  1. Create one or more balance attribute.
  2. Classify the balance attributes as Attribute or LOOKUP.
    1. From Home, select Data Exchange.
    2. From Actions, select Applications, and click Reconciliation Compliance Balances.
    3. In the Dimensions tab, under Dimension Classification, select Attribute or LOOKUP for the balance attribute.
  3. Map the required balance attributes with your data integration.


  4. Load balances using Data Integration or Data Exchange.


  5. Use the loaded balance attributes, as required:
    • View the balance attributes in the Reconciliation List, Transactions tab, Reconciliation Balances tab, and Detail Balances tab.
    • Include balance attributes in filters, format rules, profile rules, custom reports, and custom dashboards
    • Balance attributes cannot be used with a Set Attribute Value rule.

Best Practices for Using Balance Attributes

  • Ensure that balance attributes are included in your balance load
  • When loading debit or credit activity (or any currency-based amount), load it at the Functional or Reporting buckets for multi-currency applications.
  • Most balance attributes are loaded from source systems. However, for the Balance Comparison method, data need to include the attributes in subsystem integrations.
  • Consider aggregation when designing attributes.

Business Benefit: Additional balance attributes enable Service Administrators to make rules more effective and also provide improved insights into data through dashboards and reports.


Created by Mohit Jain and Megha Gupta

Ability to Create and Manage External Users

Service Administrators can now use the Manage Users tab under Access Control to create, edit, and delete external users (users who are not p...